Monday, December 31, 2012

DIY Chevron Paint Chip Art

I've been trying to fill an entire gallery wall in my "Lady Lounge". In order to accumulate that much art in a short period of time (it needs to be finished by my wedding because I'm getting ready in that room and so it'll be in my pictures) I needed to come up with a way to make inexpensive pieces myself. I'd been seeing a lot of art on Pinterest made with paint chips and thought that would be a great way to make some fun art without spending a lot of dollars. Once I saw inspiration for chevron art made from paint chips in my new Young House Love book by two of my favorite bloggers at Young House Love and I knew this project was the one! It's super easy to make and looks awwweesome! Here's the step by step:

Step 1: Acquire some paint chips. I did feel a little guilty slinking out of home depot with a pile of paint chips in my purse but I have bought a lot of paint there in my past and promise to buy all paint in the future from there to make up for it! I decided to go for an ombre look by grabbing paint chips in color succession. But you could go with more of a color blocked look too!


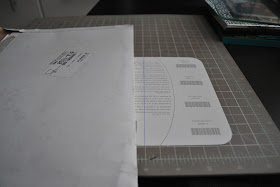
Step 2: The paint chips need to be cut into skinny vertical strips. I was able to cut out two strips on each chip without having any of the words on them. I used this craft board to measure out even strips but if you're not betrothed to a nerd like I am, (and therefore don't have a craft board on hand), you can use a ruler to measure instead! And yes, I used a big envelope to draw a straight line. I couldn't find a ruler and I believe in using whatever is handy!


Here they are all cut out in strips!  


Step 3: Lay your paint strips out into their pattern on top of your background paper. I used some white poster board for a crisp look. It's important to arrange your pattern first before gluing it down so you can plan out the spacing. My first arrangement was not what I wanted and was spaced way too close together. I was glad to have a chance to rearrange! 

First attempt:


Second attempt much better! 


 Step 4: Glue down your strips. I used this handy glue roller contraption I picked up at Michael's. A glue stick will work just as well though.


Step 5: Stand back and admire your work! I decided to make another with the pattern continuing and moving in a mirrored pattern to the first.


Here they are together. I'm really happy with how they came out! They will be a lovely addition to my gallery wall!


Looking even better in their frames!


<3

Thursday, December 27, 2012

4 Month Countdown

That's right. 4 months to go. I can't believe it! For so long, my wedding has felt SO FAR AWAY!! I guess that's what being engaged for over a year will do to you! But now it is really creeping up on me!

Since my hard drive crashed and burned on Christmas Eve (back up people. It is SO important!!) and I don't have my new hard drive yet... blog posts will be at a minimum this week. No fancy photoshopped collages for me. But since it is exactly 4 months until I say 'I do' I thought I'd break down my to do list!

All of the vendors are booked. We have our venue, caterer, photographer, florist, DJ, baker, quartet, officiant, and hair/makeup stylists! Whew, that's a lot!! I already have my dress, accessories, our invitations, the girls' dresses, the tuxes are picked out, and the linens. So what could possibly be left? Um. A lot. I've broken it down into categories so it's easier to digest!

Ceremony Related:
- Finish writing ceremony and vows (this is a BIG one! I am super lucky that I backed up my computer AFTER writing the majority of our ceremony because if I hadn't I'd still be a puddle of tears on the ground)
- Order our Ketubah (I've picked it out, just need to actually put down the money and order it!)
- Order my wedding band (Again, I've picked it out, I just need to order and pay! Oooh and for those of you who gave your opinions, thank you much! I'm going with the twist band after all. Hopefully I don't roll my eyes at myself in 10 years when I'm used to my new name!)

Paper Related:
- Choose, design, and order our wedding programs.
- Choose, design, and order our seating chart (after people RSVP of course!)
- Choose (or design) signage and get it printed (more on this at some point. Now that I'm getting handy with photoshop, I might be able to pull off designing my own wedding signs and will only have to pay to print them!)
- DIY our invitation envelop liners (supplies are purchased, just need to actually make them!)

Decor Related (this is the BIG category):
- Source and purchase paper lanterns
- Craft other hanging delights (oh, and decide what exactly I want to craft!)
- Determine what sort of vessel I will have out to collect cards from our guests
- Find the vessel I want for our guest book (vague on purpose. Don't want to spoil the surprise!)
- Craft the big letters we'll have strewn about
- Settle on a centerpiece design (I have an idea in my head that I've talked to our florist about but I need to fine tune it)
- Design the family picture area where we'll have family wedding pictures and other pictures out
- Create slide show to run during dinner (in the background while people are eating)
- Source and buy easels (and frames) for the previously mentioned signage
- Source and buy numbers for our table numbers (Ha! The number part might be important, eh?)
- Decide whether or not I want to have table runners on the tables (and if so, source and perhaps DIY them)
- Think up some cocktail hour decor (and then craft it)
- DIY (or purchase) some fun photo booth props (this one might fall off of my list as the photo booth guy is already bringing his own props)
- Make ribbon wands for people to wave during the recessional

Vendor Meetings:
- Makeup Trial (and a second trial of my up-do)
- Space Planning meeting at our venue
- Lighting meeting at our venue
- Signature drink meeting
- Florist meeting (with a sample of one of our centerpieces!)
- Phone meeting with our DJ
- Put together photography inspiration and 'must have' shots and send off to our photographer
- Email quartet with finalized song choices for the ceremony

Misc. :
- Get dress altered (oh yeah, and figure out who it is I'm going to hire to do the alterations...)
- Finalize the time table for the day (and distribute to those that need to be 'in the know')

Ok, so this post was more for me to keep myself organized than to entertain my lovely readers. It's likely that no one has actually made it this far and is still reading... but now I can direct people here when they continue to say to me "oh but you're so ahead of the game you must have NOTHING left to do for the wedding..." Yes, yes, I know all comments wedding related are well meant. But I do actually have a lot left to do.

Things to tackle in the short run (i.e. hopefully this weekend):
- Make the envelope liners
- Find the paper lanterns I want
- Hit up Michael's for supplies for further crafting

<3

Wednesday, December 26, 2012

Merry & Bright

Hey all!

Coming in a day late to wish everyone a Merry Christmas! Here's our Christmas card! Next year I need to remember to do a Hanukkah card too! Equal treatment! Hope you all had a fantastic holiday!


<3

Wednesday, December 19, 2012

Blog Room Redesign

Confession time. When we first moved into our townhouse I did a very bad and ugly thing. I painted the walls of our second bedroom like this:


I had been watching a lot of David Bromstad's Color Splash (who I still love, by the way, but maybe his style isn't my personal style anymore...) and this was supposed to be my exercise room so I wanted a bright environment to get my sweat on! Turned out I did most of my exercising at the gym and this room became such an eyesore to me I avoided it at all costs! 

When I started blogging and wedding planning I decided to make over the room to be my "blogging room." It also will serve the purpose of being the room that my ladies and I get ready in for my wedding! It has the best light in the whole townhouse and was a blank canvas for me to bring in some of the design elements I've really been loving lately! The room is still in progress but has most of the bones in place! Here's what it looks like now:


So much better, right? We still have a hit of orange with that chair and a half, which was J's doing (the man loves orange, what can I say?). I absolutely love the grey walls. They make the room feel sophisticated and will be a nice backdrop from the gallery wall I'm working on putting up!


I'm going for a bit of a Moroccan vibe in here. Not overpowering, but just hits of it like the "poof", the rug, and some Moroccan lanterns. I plan on bringing in a few more elements to tie the whole theme together.


The cats were complaining that they never make it onto my blog, so to appease them I've included this photo which also shows off my new side table from Urban Outfitters!

Since this is going to be a getting ready room I obviously had to bring in a huge mirror to check myself out in! I actually really love it there for everyday use as well.

I'm still working on the styling of everything but all of the large pieces are in place. Seating? Check. End tables? Check. Rug? Check. Mirror? Check. Lighting? Half Check.

This is my favorite little vignette in our house house. I still need to get one of our engagement pictures printed for that frame though. I love how fun those little air plants in their sea urchent shells are!

And there you have it! The whole room as it is now. See my scratch off travel map? I can't wait to scratch more and more off of it!

Things still needed to complete the room:
Curtains
Gallery Wall (I have some of the art maybe about 7 pieces or so but I have much more to go!)
Pillows
Throw Blanket (hard to find one that the cats won't eat...)
Additional lamp (the room has no overhead lighting so it's quite dark at night even with my awesome flea market lamp)

First up are the curtains. Since this is the room in the house with the most light, I want to make sure that I don't get anything too dark or heavy. I want to maximize the light! Also, the windows are behind a table and in front of a closet so I've decided not to get a curtain that goes all the way to the floor. Somehow that almost feels too fancy for the room as well. These Urban Outfitters curtains are perfect because they are just long enough to cover the window and are light and airy so they'll dress up the room and work for privacy but will let the light through. I like how the top two bunch up. The bottom two would need to have a tie to pull them off to the side when I want to see out of the windows. Right now I'm digging the subtle damask pattern of the top right curtain. I also really love that the bottom left curtain keeps with the Moroccan theme without going overboard.


The next set of curtains don't fit with the look of my room but I had to include them because they're so cute! Love those polka dots (naturally) and the floral pattern!
 

Ok, now it's time to talk pillows. Right now my beautiful peacock sofa is looking rather lonely. She needs some friends. The pillows I have sitting on the couch below are my personal favs right now. The left two pillows bring the Moroccan vibe up off of the floor and onto the sofa. I like the hit of orange on this couch so that the chair and a half doesn't feel like a lonely moment as the only orange in the room!

The pillows below the couch are great too but don't exactly fit the bill of what I'm looking for.

Couch: source

I'm tired of dragging my comforter over from my bedroom to snuggle with when I hang out in this room so I definitely need a throw! Finding one that I like AND that is a material that the cats won't eat or tear up (no wool or anything with tassels) is a hard task! I'm registered for this baby and I have my fingers crossed that some lovely lady will get it for me for my shower! I've found other options that I've liked before but they've all sold out before I got a chance to get them! Loving the ikat pattern of this one, it's the perfect color to drape over my velvet sofa and it's a cat safe material!


I mentioned earlier how dark this room gets at night. If I'm in there for too long reading or working on my computer I start to be unable to see straight! I need a bit of task lighting and this pharmacy lamp from Lamps Plus will do the trick!


Don't worry, I didn't forget that Mr. Big Orange needs some pillow love too! This chair and a half is sooo comfy and it didn't even need breaking in! Since the back cushion is super cushiony (not a word) I think just one pillow will do. I like this color blocked blue one to bring over the sofa color.


On couch: color block


Once I have those finishing touches (and the gallery wall which needs its own post) the room will be ready for me to get ready in!

What do you think? Any of those curtains tickle your fancy? Do you like some of my "extra" pillows more than the ones I've chosen?

<3


Tuesday, December 18, 2012

"Ring"ing in the New Year

Alright my friends, since you were super helpful when I came to you with my cake dilemma (an update post on that soon!) I thought I'd ask for help again. I'm having a difficult time choosing a wedding band. My engagement ring is super unique and quite the stunner so I'm going for an understated look for my band. I'm actually hoping it'll mostly not be noticed. Since one of the things I love about my engagement ring is its skinny band, I don't want to chunk the look up by adding a large wedding band. Here are a couple pictures of my engagement ring.


I've narrowed down my wedding band options to the following 2:

Option #1: A little different but not too prominent to compete with my engagement ring. Also, I think it's kinda cute that it's a twist ring and that will be my new last name! 


Option #2: Hammered rose gold. Even more understated than the first option. It'll go nicely up against my engagement ring and definitely won't compete. 


So please help me out!! Vote for your favorite in the comment section! 

<3


Tuesday, December 11, 2012

Favorite Wedding Gowns (that aren't mine)

Hey All!

I absolutely adore wedding gowns! I still watch Say Yes to the Dress every week even though I purchased my own wedding dress back in May! It's one of my favorite things to check out on wedding blogs. I have to scroll right to the dress of course! I don't think I'll ever tire of them because they are always evolving and changing and there is a seemingly endless variety.

This week I've decided to highlight my favorite wedding gowns that are not mine (or anything like mine).

First up is hands down my favorite dress I've ever seen! That skirt is spectacular! Absolutely stunning.


The next dresses featured have jaw dropping backs! This style is not for the shy bride! (Nor one that cannot go braless!) I could never pull a look like this off but I am a huge admirer! 

1//2/3/4

The next style is uber romantic! I love the texture overlay on top of the flowy tulle. 

1/2/3

Here's my second favorite dress of all time! Mesmerizing. One of a kind. Incredible. The dress of the right is a more realistic and wearable option!

1/2

The next dresses are oh so sweet, yes they are! I swoon for the scalloped lace number on the bottom right!

1/2/3/4

Gold. Shimmery. Glitzy. Perfection.

1/2/3

I just love capped sleeves! A very simple and lovely style. 

1/2/3/4

And of course, to go along with my favorite dresses that aren't mine, my favorite necklace that isn't mine! I mean seriously, this gal is phenomenal! 


<3


Saturday, December 8, 2012

Hanukkah Decor

It's time for my Hanukkah post! Every year it is frustrating to me the amount of Christmas decorations out there and the significant lack of Hanukkah decorations. Thus, I wanted to come up with some ideas for what us Jews can do to bring in that holiday feeling! Decorations aren't as important to Hanukkah as they are to Christmas but as you know, I love to decorate and will use any excuse to do so! Here's my guide to decorating for the Festival of Lights!

Everyone knows the star of Hanukkah is the menorah! You can't celebrate without it! The menorah represents the miracle that we celebrate. The story goes that as the Macabees were preparing to rededicate the Second Temple they only had one day's worth of olive oil to keep the menorah burning. The menorah needed to stay burning all day and all night. The one day's worth of oil burned for 8 days which allowed enough time to make more olive oil and keep the menorah burning from then on!

Here are some beautiful and fun menorah's that will be the show stopper of your holiday celebration!

1/2/3/4/5/6

Since there aren't lot of Hanukkah lovelies out there to purchase, going hand crafted is the best way to get beautiful, unique decor. I love the idea of cut out banners, paper chains, and window stickies!


1/2/3/4/5/6/7

One place where Hanukkah can really go full force is the table! It's all about the food! Latkes anyone? The glitter dreidels are wonderful and so fun! They can be used in many different ways to create decor. Those festive serving platters are actually from Crate & Barrel, so you can find some Hanukkah products at familiar stores. 

1/2/3/4

There are so many great ways to make Hanukkah fun for kids! My absolute favorite thing to do when I was young (besides open my presents, naturally!) was to put the felt flame on the menorah every night! I adore the huge "life sized" menorah! Your kids can help you collect twigs for your large scale Star of David and as a reward they can eat Hanukkah cake pops! If you have a whole bunch of little ones coming over for your Hanukkah party, make them act as the menorah! They'll love getting involved and wearing something silly on their heads! And the glitter rhino menorah? Obsessed. 

1/2/3/4/5/6

Finally, this is the most fantastic mantel decor for Hanukkah I've ever seen! So playful! The "Oy" instead of the Christian traditional "Joy" cracks me up!


Happy Hanukkah everyone!!

<3


Thursday, December 6, 2012

Groomsmen Style

Time to get down to business and talk about the men's fashion. I know that most of my blog is about pretty things and dresses and hair and flowers... but the guys deserve to have their moment in the sun!

I personally like when the groom's look is noticeably different from his groomsmen. And I'm not talking just a different colored vest and tie, I'm talking a completely different suit. After all, the bride gets to look completely different from her bridesmaids! The groom should get to stand out as well. 

I am really loving the grey look. It's a bit more casual than black but is still refined. Plus, I think it will look fantastic with my plum bridesmaids! I asked J if he would prefer to wear light grey or dark grey. He said he'd like to go light which I think is great because it will really draw the eye to him! 

Here are my favorite images of mismatched grooms and their men!


Sexy yet playful, right? 

We went out to look at tuxes a few weeks ago and made the final decision! For J, we're going with a light grey Calvin Klein tux. And the guys will be rocking charcoal grey Vera Wang tuxes! We're renting them through Men's Warehouse and had a really great experience with them! The gal helping us was super cute and fun and made us feel comfortable to ask any questions and express our opinions! She had some really great pointers as well. And the great thing about their pricing is that it is itemized. I thought that there would just be a tux rental price that included everything and that would be that. Nope! Since we aren't going to be using a vest, cumber bun, or shoes we didn't have to pay for them! That definitely helped to keep costs reasonable for our favorite men! 

Naturally, since my dress is ivory, all of the guys will be wearing ivory shirts under their suits. The groomsmen will be wearing light blue ties (much like the color of the guy in picture #1 below). I love the color of tie we picked out! It's very light and almost bordering on the green side. They're going to look so great! J and I discussed different options for his tie. Originally I was thinking he would wear a plum tie but I decided it would be too busy. I'd also like for us to look more classic in the pictures of just the two of us and leave the wedding colors out of it. I gave him the choice of a gold tie or ivory and he's going with ivory. He thinks it has a very vintagey look. I just got to see him try on the suit jacket and Oooooh I can't wait to see him in the entire ensemble! I am marrying one sexy man! 

1/2/3

The final touch, of course, is the flowers! To go with my girls, I'm going to give the guys babies breath bouts. I think it is simply adorable! They'll be wrapped in copper wire and I'm debating whether or not to throw a little swath of fabric behind them for a pop of pattern! 

For J, he gets one purple bloom. To butch it up a little bit we'll add a sprig of muscari (the blue flower below). 

 1/ 23/4


And there you have it! The men will be stunningly stylish in their own right and not just the frame for the girls! We have a couple surprises up our sleeve with the men's attire, but you'll have to wait until after the wedding to find out what that is!

<3